Moving Beyond Auto: Understanding Manual Mode for Creative Control
If you’ve been shooting in auto mode, you’re letting your camera make all the creative decisions. While modern cameras are incredibly smart, they’re designed to produce technically “correct” images—not necessarily artistic ones. Manual mode photography unlocks your camera’s full potential, letting you create images that express your unique vision rather than following preset formulas.
For photographers drawn to impressionist photography and painterly aesthetics, understanding manual camera settings isn’t just helpful—it’s essential. The dreamy blur, the selective focus, the ethereal quality of light that defines impressionist work? Those effects are born from intentional manipulation of three fundamental settings: aperture, shutter speed, and ISO.
The Exposure Triangle: Your Creative Foundation
Think of manual mode photography as conducting an orchestra. Aperture, shutter speed, and ISO work together to create the perfect exposure, but each also contributes its own creative signature to your image. Master these three elements, and you’ll transform from someone who takes photos to someone who makes photographs.
Aperture: Painting with Light and Depth
Aperture controls how wide your lens opens, measured in f-stops like f/1.8, f/4, or f/16. The smaller the number, the wider the opening—and here’s where things get interesting for creative photography.
For impressionist photography, aperture is your primary tool for creating that soft, painterly quality:
- Wide apertures (f/1.4 – f/2.8): Create shallow depth of field with beautifully blurred backgrounds (bokeh). Perfect for isolating a single flower in a meadow while the rest melts into soft colour washes, mimicking Monet’s selective focus on water lilies against dreamy garden backgrounds.
- Medium apertures (f/4 – f/8): Offer moderate depth of field, keeping your subject sharp while gently softening the surrounding context. Ideal for environmental portraits or garden scenes where you want some context but still maintain that impressionist feel.
- Narrow apertures (f/11 – f/22): Keep everything sharp from foreground to background. While this might seem counter to impressionist goals, it’s valuable when you’re using intentional camera movement or slow shutter techniques, where you don’t want the entire frame to be involved in the blur.
Creative application: Try shooting the same subject at f/1.8, f/5.6, and f/16 to see how dramatically aperture changes the mood. Notice how wide apertures create intimacy and romance, while narrower apertures suggest expansiveness and detail.
Shutter Speed: Capturing Time and Motion
Shutter speed determines how long your camera’s sensor is exposed to light, measured in fractions of a second (1/1000, 1/250) or full seconds (1″, 2″).
This is where camera settings for impressionist photography truly shine. Shutter speed doesn’t just freeze or blur motion—it interprets it:
-
-
- Fast shutter speeds (1/500 – 1/4000): Freeze action crisply. While typically used for sports or wildlife, occasionally you’ll want a sharp moment in an otherwise soft composition.
- Fast shutter speeds (1/500 – 1/4000): Freeze action crisply. While typically used for sports or wildlife, occasionally you’ll want a sharp moment in an otherwise soft composition.
- Moderate speeds (1/60 – 1/250): Your everyday range for sharp handheld shots. The general rule: your shutter speed should match or exceed your focal length (1/100 for a 100mm lens).
-
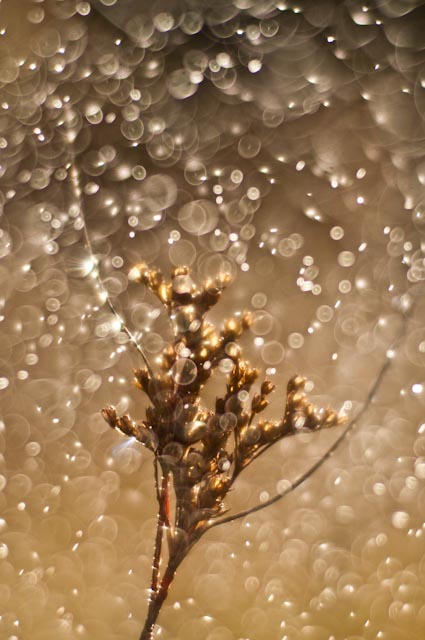
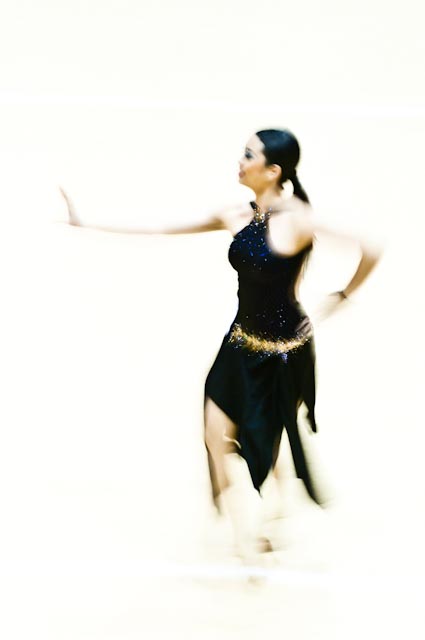
- Slow shutter speeds (1/15 – 1 second): Here’s where impressionist magic happens. Moving water becomes silky veils, wind-blown flowers create ghostly traces, people moving through scenes leave painterly streaks.
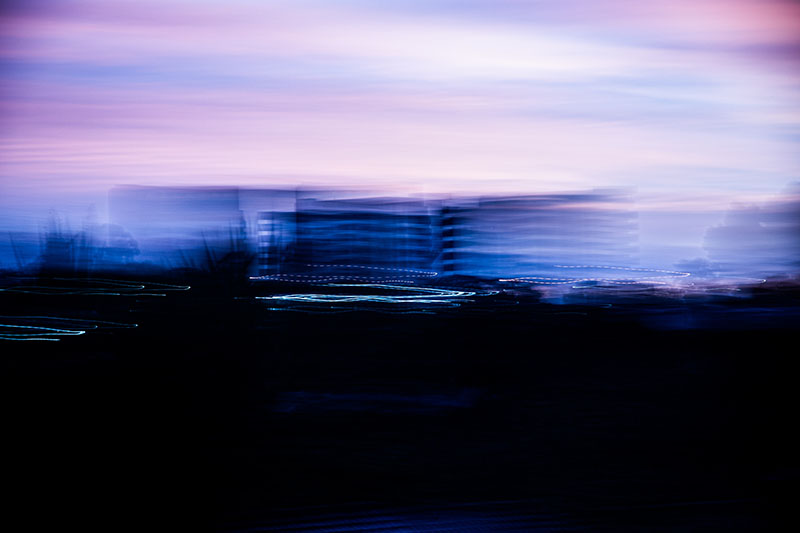
- Very slow speeds (1 second and beyond): You can create extreme motion blur effects. Clouds streak across skies, moving traffic becomes rivers of light, and water transforms into misty fog.

Creative techniques for impressionist work:
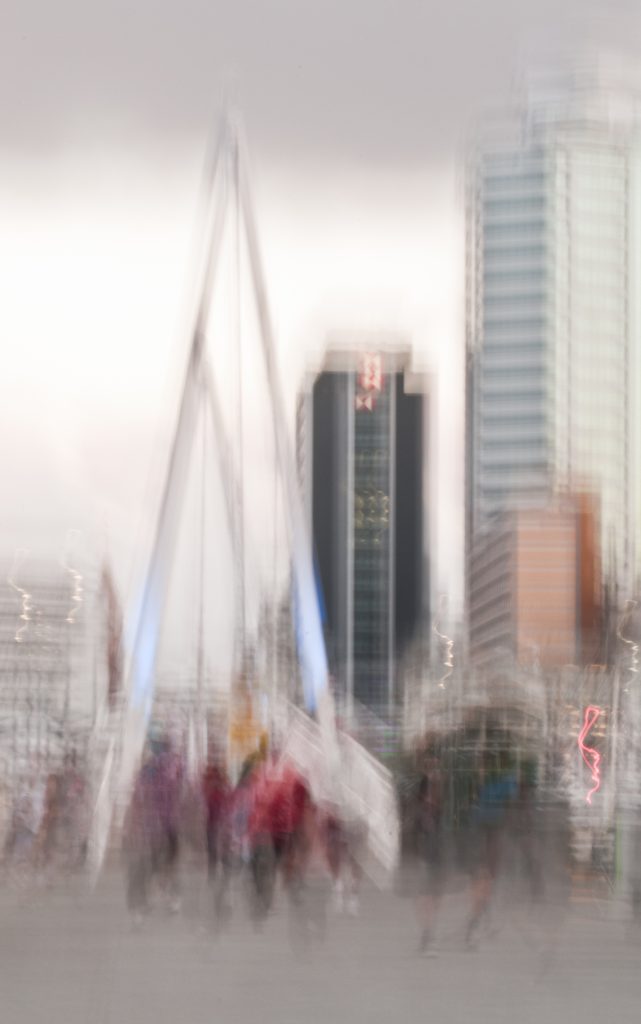
- Intentional Camera Movement (ICM): Set your shutter to 1/4 to 1 second and gently move your camera during exposure—pan, twist, or lift it to create abstract, painterly effects that echo impressionist brushstrokes.
- Subject Movement Blur: Keep your camera still at 1/15 to 1/2 second while photographing moving subjects like dancers, flowing fabric, or wind-blown grasses for that captured-motion ethereal quality.
- Zoom Burst: Zoom your lens in or out during a 1/2 to 2-second exposure for explosive, radial impressionist effects.
ISO: Controlling Sensitivity and Grain
ISO determines your sensor’s sensitivity to light. Lower numbers (100-400) mean less sensitivity but cleaner images. Higher numbers (1600-12800) increase sensitivity but add grain or noise.
For impressionist photography, grain can be your friend:
- Low ISO (100-400): Produces clean, smooth images with minimal grain. Start here for most artistic work, especially in good light.
- Medium ISO (800-1600): Allows faster shutter speeds or narrower apertures in lower light while adding subtle texture that can enhance the painterly quality.
- High ISO (3200+): Creates pronounced grain that can actually enhance impressionist aesthetics, adding texture similar to canvas weave or visible brushstrokes. Don’t fear noise—embrace it as a creative tool when it serves your vision.
Creative consideration: Shoot the same twilight scene at ISO 400 and ISO 6400. The higher ISO version may have grain, but it could also have that film-like, nostalgic quality that perfectly complements impressionist work.
Making the Leap to Manual Mode
The transition from auto to manual mode photography doesn’t have to be overwhelming. Here’s a practical approach:
- Start with Aperture Priority mode (A or Av) to get comfortable controlling depth of field while the camera handles shutter speed.
- Experiment with Shutter Priority mode (S or Tv) to master motion control while the camera manages aperture.
- Gradually move to full Manual mode (M) when you want complete creative control over both settings simultaneously.
- Shoot in RAW format for maximum flexibility in post-processing, especially important for impressionist work where you might want to enhance colors, contrast, or mood.
The Creative Freedom Awaits
Manual mode photography isn’t about memorizing technical rules—it’s about understanding the creative language of your camera. Once you know how aperture affects depth, how shutter speed interprets motion, and how ISO influences texture, you can make intentional choices that bring your artistic vision to life.
For impressionist photography, these settings become your brushes and palette. Wide apertures and slow shutters don’t create “correct” images by technical standards—they create evocative, emotional, painterly images that transcend documentary photography and enter the realm of visual poetry.
The difference between a photographer who uses manual mode and one who doesn’t isn’t technical proficiency—it’s creative intention. When you control your camera settings, you’re no longer simply recording what’s in front of you. You’re interpreting it, expressing your perspective, creating art.
Ready to Master Your Camera Settings?
Understanding manual mode is one thing—having quick reference when you’re in the field is another. Every impressionist technique, from ICM to bokeh blur to zoom bursts, requires specific combinations of aperture, shutter speed, and ISO.